AmberCutie's Forum
An adult community for cam models and members to discuss all the things!
  • ** WARNING - ACF CONTAINS ADULT CONTENT **
    Only persons aged 18 or over may read or post to the forums, without regard to whether an adult actually owns the registration or parental/guardian permission. AmberCutie's Forum (ACF) is for use by adults only and contains adult content. By continuing to use this site you are confirming that you are at least 18 years of age.
Status
Not open for further replies.
@haven ... I know codes might look like gibberish for some but here it is, the basic code
Code:
<img src="https://keighsite.files.wordpress.com/2016/11/14996434_1235376549815963_1285546565_n.jpg"/>

Im trying to put images into my bio. I used this code but the image shows up over top of my cam feed and it is huge.. how can i make it stay down in my bio and put other images below the first one....?
Thanks so much
 
This will do?
Code
HTML:
<p style="display:block;width:35px;height:auto;text-align:center;position:fixed;top:160px;left:0;"><a href="your-amazon-link"><img src="https://editbio.files.wordpress.com/2016/09/01_ama.png" style="display:block;width:35px;height:auto;margin:0 auto;"/></a>
Will render this image
01_ama.png

Add your amazon link between those double quotes.
If you wanna change the icon... here are some alternatives to choose from
06_ama.png

Code:
https://editbio.files.wordpress.com/2016/09/06_ama.png

2ama.png

Code:
https://editbio.files.wordpress.com/2016/09/2ama.png

1ic_ama.png

Code:
https://editbio.files.wordpress.com/2016/09/1ic_ama.png

icr_ama.png

Code:
https://camgirlbioeditor.files.wordpress.com/2016/11/icr_ama.png

icbg_ama.png

Code:
https://camgirlbioeditor.files.wordpress.com/2016/11/icbg_ama.png

icp_ama.png

Code:
https://editbio.files.wordpress.com/2016/11/icp_ama.png

ic_amazon.jpg

Code:
https://editbio.files.wordpress.com/2016/11/ic_amazon.jpg

Change the image width attribute as you see fit... I usually use 35px width as I don't want to overlap other elements.


Thank you so much!!! I have been trying to figure out how to do this forever!!!
 
February freebie
Chaturbate Bio design Celine
- image based bio design
screenshot_celine_cb_bio.jpeg

The pack includes all documentation, full codes, graphic resources (images and PSD) ... basically all you need to help you get started.
Even if the design is image-based, you'll need to have some basic skills of HTML editing. For example you'll want to put some text on About Me image, you'll need to upload the image online and replace the default URL via source markup... expert in copy/paste :)

The resources folder has bot versions of the images used (with text on it see the above screenshot and the empty images, for you to add content on them. Gimp can be helpful in this case)
- image folders
- demos
- codes in lain text file
- install and editing instructions

Optional: if you feel like I did a decent or awesome job you can offer a cup of... a beer will do just fine. Send a Smile Thanks
 
Im trying to put images into my bio. I used this code but the image shows up over top of my cam feed and it is huge.. how can i make it stay down in my bio and put other images below the first one....?
Thanks so much

The best approach is wrapping all your images into a single parent element and make them all responsive.
Unfortunately Chaturbate is delivering images via proxy so the url of your images are nasty (a long string of alphanumeric characters) so I can not provide you with copy/paste markup code but it should look like this.

<p style="display:block;width:100%;height:auto;padding:0;line-height:normal;margin:120px auto 50px -146px;">
<img src="your-image-url-here" style="display:block;width:100%;height:auto;margin:0 auto;"/><img src="your-image-url-here" style="display:block;width:100%;height:auto;margin:0 auto;"/><img src="your-image-url-here" style="display:block;width:100%;height:auto;margin:0 auto;"/><img src="your-image-url-here" style="display:block;width:100%;height:auto;margin:0 auto;"/><img src="your-image-url-here" style="display:block;width:100%;height:auto;margin:0 auto;"/></p>

Now... a few pointers... as you can see I did not use any spaces (backspace or enter) between images because it will be interpreted as <br/> and upon saving the images will have an empty space (white space/gap) between them.
Using 100% width for images will make them responsive but DO use decent size (I'd recommend around 1000px width) because right now all your images look very small, a bit difficult to read the content.

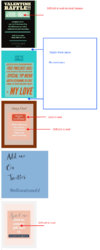
Make all your images same width size (optional and recommended). Avoid using white text on top of a lite background graphic or image (see the screenshot below)
screenshot-7.jpeg
If you need help, let me know and I will throw some tips on how to use different font combinations... because not all fonts look good in certain combinations. For example Join Club section is using a good font combo.
Bold heavy fonts are used for titles. A calligraphic font (which is more feminine script type does not work superb with a bold text below) reference at Spoil Me.
On Add Me on Twitter, you can balance the section by adding the twitter bird in the right empty space next to the dark text ...

Please don't take my suggestions as criticism because they are not. I only make suggestions so you can take full advantage of your Bio page.

 
Wow!!
Thank you so much for all that and such prompt help!!!
One more question... What if I wanted to have the photos side by side in tiles of two going down the page?

If you are using smaller images its ok to use float:left... something like this


<p style="display:block;width:100%;height:auto;padding:0;line-height:normal;margin:120px auto 50px -146px;">
<img src="your-image-url-here" style="display:block;width:50%;height:auto;margin:0 auto;float:left;"/><img src="your-image-url-here" style="display:block;width:50%;height:auto;margin:0 auto;float:left;"/><img src="your-image-url-here" style="display:block;width:50%;height:auto;margin:0 auto;float:left;"/>
<i style="display:block;width:100%;height:1px;float:none;clear:left;margin:10px auto 12px auto;"></i></p>

the <i> tag will act like a divider so the <p> can hold all graphics inside.
as you can see, the width for the images is set to 50%, which means they will be displayed 2 in a line

use 30% width to display 4 in line or 20% (the images will be smaller) an 5 in line.

demo
https://jsfiddle.net/cle_dan/x7b0pgka/
 
Last edited:
Is there a way to add an amazon gift card to the about me section

Either link to an amazon wishlist (style to preference like hyperlink, clickeable image or button) with giftcard as option or provide email address where giftcards may be sent to. So yeah you can add a gift card option.
 
Hello So I’ve heard that Canva is a good place to make a CB bio...Unfortunately I can’t get it to work. I made a bio design that I love but when I use the HTML code Canva gives me, it doesn’t show up on CB. It shows up as a link that takes you to the Canva page with my design on it instead of just showing my design in the “about me” section.
Is there extra code I should be adding to the code Canva gives??
Canva is great for making graphics but you have to do the html on your own. Canva is not a website designer it’s a graphics program.
 
Hi Dan. I would like my bio centered, and to have a background color, preferably pink. Including wrapping around the actual video window and chat box. I see other girls with color around the entire page. How do I do that?!?!? Thank you so much!

To have background colour around page you can use this code:

HTML:
<p  style="display: block;width: 100%!important;min-height: 2000px;height: 100%!important;z-index: -55;position: fixed;top: 0;left: 0;background-color: #FF00FF;background-attachment: fixed;"></p>

The colour is determined by the # value, you can pick any colour by changing it to corresponding hex colour code, you can find these on many sites like for example http://www.color-hex.com/
 
  • Like
Reactions: Lacey Whaaaaaaaat
AWESOME! It worked! I wasn't sure where to put it in my current code for the about me section, so I put it in the wishlist section. But how can I get the "about me" area to have a pink background as well? Where would I place that code? Thank you sooooo much. Also, do I need to center my about me bio? It seems off to the left. Thanks again
 
After you are done with editing process, adding your own image, texts so on... copy the code from HTML box and paste it on your Chaturbate Bio > Edit Bio > About Me box (works ok on Wishlist box too)


How do you edit the code with your own info pls? Sorry, dumb question as not very technical at all. Thanks for any help :)
 
How do you edit the code with your own info pls? Sorry, dumb question as not very technical at all. Thanks for any help :)

I run a service which allows the registered member to edit (add their own content) to a pre designed bio template so you don't have to learn the basics of HTML/CSS markup editing - Camgirl Live Editor

If you are a swift learner I'd encourage you to DIY (do it yourself), and the best way is to get familiar with basic HTML CSS editing (image editing is not to be left aside)
 
I'm trying to change the background color of the text/ bio box. I know html but It's not working for me. Can anyone tell me how to do it. I also mean just the bio box not the background of the whole page.
 
I'm trying to change the background color of the text/ bio box. I know html but It's not working for me. Can anyone tell me how to do it. I also mean just the bio box not the background of the whole page.

Out of curiosity, what are/was you using that's not working?
Add something like this to your About Me section - Note: I made this so it also makes most of the section where existing default text is, such as Name, Age, Last Broadcast etc).


Code:
<p style="margin: -370px 0px 0px -150px; background: #000000; width: 100vw; height: 100vh;"></p>


Note: For the margin, remember it as this:
TRBL (TROUBLE):
Top
Right
Bottom
Left
(It goes clockwise)
This one makes the Age, name ect. texts blue but thank you!
 
This one makes the Age, name ect. texts blue but thank you!

You asked for the background colour.
Maybe I misunderstand what you meant.. ? The text for those are blue by default and can not be altered. The only way to change them would be to overlay them with an image and essentially redo/redesign them, making sure the stuff is in the correct position.
 
The About Me box can hold customized markup but it is not recommended to use position:absolute attribute.
To add a background color for a single text element inline css must be used.
For example:
HTML:
<p style="display:block;width:97%;height:auto;padding:5px 9px;text-align:left;background-color:#000;color:#fff;line-height:normal;margin:0 auto;">Some text here...- single text line</p>

it will render a white text on a black background.

To use multiple lines of text with different colors on a single background color, this will do the job
Example:
HTML:
<p style="display:block;width:97%;height:auto;padding:5px 9px;text-align:left;background-color:#000;line-height:normal;margin:0 auto;"><i style="display:block;color:#fff;line-height:normal;font-style:normal;line-height:normal;">This text element will be white</i><i style="display:block;color:#ccc;line-height:normal;font-style:normal;line-height:normal;">This text element will be grey</i><i style="display:block;color:#f00;line-height:normal;font-style:normal;line-height:normal;">This text element will be red</i><i style="display:block;color:green;line-height:normal;font-style:normal;line-height:normal;">This text element will be white</i></p>

In the second example there are multiple lines of text with different colors (defined by italic html element with diff css color values) but you'll notice that all of them are wrapped into a single <p> tag.

line-height:normal - is there to fix the issue which seams to appear when above text is overlapping the below one
To the same css other attributes can be added like font-size / removing the font-style:normal; will make the text italic (oblique) / change color by editing the color: value / text-transform/ text-shadow/ ... and so on...
 
The graphics in my profile keep getting cut off. . . They look fine on larger screens, but they get cut off on the right on smaller ones or when you make the browser window smaller. How can I get them to automatically adjust size so they fit? Here's my profile: chaturbate.com/emiliasongcam
Any chance you could help me make my profile look something like you have on your profile?I am new to chaturbate and would love to change mine up.thank you
 
I am new to camming on chaturbate can anyone help me? I am looking to make my profile look good.If someone could guide me I would appreciate it.As I have read Dan202 sounds like he knows what he is doing.thank you in advance for any help.
 
Any chance you could help me make my profile look something like you have on your profile?I am new to chaturbate and would love to change mine up.thank you

A straightforward image profile can be easily made, you can create images yourself and to your liking on a site like www.canva.com, host them somewhere like tinypic and apply link in code such as:

HTML:
<img src="YOURIMAGEHERE" style="display: block;width: 100%;"/>
 
A straightforward image profile can be easily made, you can create images yourself and to your liking on a site like www.canva.com, host them somewhere like tinypic and apply link in code such as:

HTML:
<img src="YOURIMAGEHERE" style="display: block;width: 100%;"/>
Ok thank you very much I will try it and see how it works for me.thank you again
 
For those who want to "dig deeper" into professional profile making using not only a image I've made a starter package suitable for both beginners and newbies in basic coding
https://camgirl.xniteproductions.com/cb-profiler/community/begginers-guide-to-html/
Full documentation here and you can download it too
https://camgirl.xniteproductions.com/p/coding-for-beginners/

PS: also comes with a "markup tester" --- you add the codes in a text box and with a push of a button it renders it (no need for an internet connection)
Enjoy --- courtesy of Camgirl Live Editor dev and assistance team
 
Status
Not open for further replies.